When he was small, my youngest son had a habit of filling his pockets with treasures he encountered in his daily adventures. I didn't always understand the value he saw in his chosen objects -- really, how many rocks and sticks could one boy keep? In his eyes, though, each one was beautiful and important. Life is just like that on a larger scale, isn't it? We gather up the precious bits of our experiences and save them all to learn from and enjoy later. Perhaps you'll find a little something here that you'd like to keep in your own pockets. Thanks for visiting.

Showing posts with label eating well. Show all posts

Monday, July 4, 2016

Grilled Chicken, Veggie, and Pineapple Skewers with Orange Maple Sauce

Matt and the boys and I enjoyed the first long weekend of the summer by staying close to home and hanging out all together. There was lots of swimming and laughing, puttering and playing in the gardens and yard, a trip to the local farmers' market on Saturday morning, and tasty meals made easily and pleasantly with fresh ingredients and plenty of free time to enjoy the process. The start of summer holidays always comes with such an exhilarating feeling of lightness and spontaneity; we're all open to discovering new things in the wide open spaces (both the physical and the mental ones) that this relaxed, happy season often provides.

Saturday afternoon sun halo

One of our favourite meals from the weekend involved skewers threaded with chicken, peppers, zucchini, red onion, and pineapple, brushed with an orange maple sauce, and grilled nicely on the barbecue. I didn't plan for this meal to be part of a food post here, but the skewers looked and tasted so good when they came off the grill that I thought I'd share the recipe. (Luckily I have a patient family who was willing to wait to eat their dinner until I had snapped a few impromptu photos of it!)

Chicken, Veggie, and Pineapple Skewers with Orange Maple Sauce


4 boneless, skinless chicken breasts
2 sweet bell peppers, any colour
2 small zucchini
1 small red onion
half of a peeled and cored pineapple
1/4 cup fresh orange juice
2 tbsp pure maple syrup
1 tbsp olive oil
1/2 tsp ground cumin
a pinch of sea salt

Preheat the barbecue to medium heat. Cut the chicken, vegetables, and pineapple into similarly sized pieces, about 1 1/2 inches each. In a small bowl, whisk together the orange juice, maple syrup, olive oil, cumin, and sea salt.

Thread the chicken, vegetables, and pineapple onto skewers. (If you're using wooden ones, be sure to soak them in water for 20 minutes first.)

Place the skewers on the preheated grill and brush them with the orange maple sauce. Grill them for 15 to 20 minutes or until the chicken is cooked through, brushing the chicken, vegetables, and pineapple frequently with the remaining sauce, and turning the skewers 5 or 6 times during the cooking process.

Serve grilled skewers with a side of whole grain rice and enjoy a simple but delicious summer meal!

Oh, one more thing before I go: If you enjoy following my stories and recipes here, you can now also find me on Instagram. Noah recently convinced me to actually try doing something with the account I had created there a long time ago, and I'm really enjoying its format for sharing photos and little snippets of life. I'm also still active on my Facebook page -- stop by and say hello if you haven't yet visited! :)

Tuesday, June 7, 2016

Mediterranean Pasta Salad

I planted our vegetable garden mid-week last week, and by the weekend, there were already tiny, eager green shoots pushing their way through the soil towards the sun. I never stop being amazed by this process each spring, the sudden bursting forth of potential encouraged by the combined efforts of me and Mother Nature.


The warm months are my most favourite time of the year for food. Every week there is something new in the gardens or at the farmers' market for us to enjoy, and it seems almost effortless to put together meals that are full of appealing colours and flavours. Today I'm sharing a recipe for a simple, hearty pasta salad that I often make to serve a crowd during the fun-filled summer months.


Mediterranean Pasta Salad 
(adapted from this recipe from Chatelaine magazine)


3 generous cups dry fusili pasta (I used a gluten-free brown rice version)
1 540ml can romano beans, drained and rinsed
half of each of a sweet red, yellow, and orange bell pepper, diced
1/2 cup kalamata olives, pitted and halved
1/3 cup chopped fresh parsley

3 tbsp olive oil
2 tbsp red wine vinegar
1 tbsp freshly squeezed lemon juice
the zest of one small lemon
1 clove of garlic, minced
1/8 tsp sea salt

Cook the pasta according to the package directions. Drain, and rinse under cold running water until cooled. Allow pasta to sit in the colander for a few minutes to drain well.

In a large bowl, whisk together the olive oil, red wine vinegar, lemon juice, lemon zest, garlic, and salt. Add the cooked pasta, romano beans, sweet peppers, olives, and parsley to the bowl and toss gently to combine. Serve immediately, or refrigerate for later.

This colourful salad is really easy to prepare and is perfect make-ahead side dish or main for all kinds of summer eating: potlucks, family barbecues, picnics, a quick and healthy lunch on the go. (Simply double the recipe for a larger crowd.) Enjoy the coming season of delicious food and happy times with family and friends!

Friday, March 18, 2016

March Muffin Madness: Nut Butter, Banana and Jam Muffins (gluten-free, dairy-free, egg-free)

Today I'm sharing a recipe as part of a March Muffin Madness event that kicked off earlier this week and is hosted by my friend Shirley of Gluten Free Easily. Every day through April 5th, Shirley will be highlighting a delicious new gluten-free muffin recipe created by one of the twenty-two participating bloggers. (That's a lot of new muffin recipes for those of you who love muffins or who have kids who love them as much as mine do!) In addition, she's rounded up an amazing collection of prizes to send out to some lucky winners, both through daily giveaways and in a grand prize giveaway at the end of the event.

Find out more about March Muffin Madness here.

This was a perfect week for me to work on a new muffin recipe, as my boys have been home every day for the March Break, looking for things to do and things to eat! Will put his creative energy to good use and came up with the concept for the nut butter, banana and jam muffins featured here -- he thought the combination of his favourite breakfast flavours would make a great anytime snack. I agreed with him, and all four of us were super happy with the scrumptious muffins that resulted when I turned his idea into a recipe. These nutritious gluten-free, dairy-free, egg-free muffins are versatile, too: they can be made with any kind of jam or nut butter to suit different preferences.

Nut Butter, Banana and Jam Muffins


For the jam:

2 cups fresh or frozen berries (I used a combination of blueberries, raspberries, strawberries, blackberries, and dark sweet cherries)
1 tsp coconut palm sugar
1 tbsp ground chia seeds

For the muffins:

2 1/2 cups blanched almond flour
1/2 cup certified pure oats, ground
1 tsp baking powder
1/4 tsp sea salt
1/4 cup natural nut butter, melted (I used cashew butter)
2 tbsp unsweetened almond milk
2 tbsp pure maple syrup
1 tsp vanilla extract
1 tbsp ground chia seeds mixed with 3 tbsp water (stir and let stand for a minute or two to form a gel)
2 medium sized ripe bananas, mashed

For the crumble topping:

1/4 cup certified pure oats
1/3 cup chopped nuts (I used cashews)
1 tsp coconut palm sugar
a pinch of sea salt
1 tbsp natural nut butter, melted (I used cashew butter)

To make the jam, pulse the fresh or frozen berries in a food processor until they break down into small pieces. Spoon the berries into a saucepan and add the coconut palm sugar. Place the saucepan over medium heat and cook the berries for about 10 minutes, stirring often. Gradually stir the ground chia seeds into the hot berry mixture. Reduce the heat to medium low and cook for another 10 minutes, continuing to stir occasionally. Remove the thickened mixture from the heat and allow it to cool slightly, then spoon the jam into a lidded glass container and place it in the fridge to continue to cool and set.

If you're pressed for time and would rather not make your own jam, you can use a good store-bought version instead. The homemade jam makes these muffins especially delicious, though!

Preheat the oven to 350 F, and fill a 12-cup muffin tin with paper liners. To make the muffins, combine the almond flour, ground oats, baking powder, and sea salt in a large mixing bowl. Whisk together the melted nut butter, almond milk, maple syrup, and vanilla extract in a smaller bowl. Add this mixture, the chia seed gel, and the mashed bananas to the dry ingredients and stir until everything is well combined.

Spoon muffin batter into the prepared muffin tin so that each paper cup is just under half full. The batter will be thick, so press it down a little with the spoon so that it fully covers the bottom of each paper cup. Add a spoonful of the jam in the centre of each muffin.


Divide the remaining muffin batter between the twelve cups, using a spoon to spread out the batter so that the jam is covered.

To make the crumble topping, combine the oats, chopped nuts, coconut sugar, and sea salt in a bowl. Drizzle the melted nut butter over this mixture, and use a fork to mix the nut butter evenly into the other ingredients. Spoon the crumble topping over the tops of the muffins. Place the muffin tin in the preheated oven and bake for 30 minutes.

Remove the muffins from the oven and let them cool.


These nut butter, banana and jam muffins are sure to be enjoyed by anyone who wants to try a long-time favourite flavour combination in a new form.

Here's something else I think people will like: the grand prize giveway for March Muffin Madness has some exciting prizes for the lucky winners, including a half-gallon of Hidden Springs Vermont organic maple syrup, a 5-lb bag of Honeyville almond flour, a USA Bakeware 12-cup muffin pan, a Cuisinart ice cream maker, a Paderno World Cuisine vegetable slicer/spiralizer, a Crockpot casserole slow cooker, and an Instant Pot pressure cooker. The super grand prize is a Blendtec Designer 625 with Wildside+ and Twister jars! Take a look at all of the prizes and enter using the Rafflecopter box below for your chance to win -- you can enter daily. You can also earn additional entries for the grand prize giveaway by leaving a comment on any of the participating posts during the event. (There is a maximum of one comment entry per person per post.)

a Rafflecoptergiveaway

Lastly, head on over to Gluten Free Easily every day from now until April 5th to discover a yummy new muffin recipe and to enter the daily giveaways for cookbooks, resource books, subscriptions, and meal plans. March Muffin Madness indeed!

Friday, February 12, 2016

Chocolate Cherry Valentine Cupcakes (gluten-free, dairy-free, egg-free)

When special occasions like Valentine's Day are near, I often enjoy using the time that I'm home alone to bake a surprise treat that my three guys and I can all enjoy together. This afternoon I had several hours free, so rather than turning to one of our old favourite chocolate recipes (cashew butter balls, mmmm!), I decided to play around a bit and come up with something new. Will was thrilled when he came home and discovered the heart-shaped silicone baking cups drying in the dish rack -- he went rushing around the house on an instant treasure hunt to find whatever it was I had made in them. His eyes lit up enthusiastically when he came across these chocolate cherry cupcakes in the fridge, and he wanted to know how soon he could eat one. With their delicious chocolate base and their toppings of a homemade cherry sauce, whipped coconut cream, and a sprinkling of dark chocolate, these cupcakes are making all of us eager for dessert this weekend!

Chocolate Cherry Valentine Cupcakes


For the cherry topping:

2 cups frozen pitted sweet cherries
1 tbsp water
1 tsp coconut palm sugar
1 tbsp ground chia seeds

Add the cherries, water, and coconut sugar to a saucepan over medium heat. Cook the cherry mixture for 10 to 15 minutes or until the cherries have softened, stirring often and using the spoon to break the cherries up a little.

Gradually add the ground chia seeds to the hot mixture, stirring continuously while adding them, then lower the heat and cook for another 10 minutes or until the cherry mixture has thickened. Remove the cherry sauce from the heat and let it cool slightly. Place it in a lidded glass container and put it in the fridge to set while you bake the cupcakes.

For the cupcakes:

3 cups blanched almond flour
1/4 cup cocoa powder
3 tbsp arrowroot flour
1 tsp baking powder
1/4 tsp sea salt
1/4 cup melted coconut oil
1/4 cup pure maple syrup
3 tbsp unsweetened almond milk
1 tsp vanilla extract
1 cup mashed ripe bananas

Preheat the oven to 350 F. Arrange twelve heart-shaped silicone baking cups in rows on a baking sheet.

Combine the almond flour, cocoa powder, arrowroot flour, baking powder, and sea salt in a large mixing bowl. In a smaller bowl, whisk together the coconut oil, maple syrup, almond milk and vanilla extract. Add the wet ingredients to the dry ingredients and stir well. Add the mashed bananas to the mixture and stir until all ingredients are well combined.

Divide the cake batter between the twelve heart-shaped baking cups, using a spoon to make sure it's spread out smoothly to fill all parts of each heart. Place the baking sheet in the preheated oven and bake for 30 minutes, or until a toothpick inserted in the centre of a cupcake comes out clean. Let the cupcakes cool. Once cooled, remove the cupcakes from the silicone cups.

For the whipped topping:

1 398ml can of chilled, unsweetened, full-fat coconut milk (I used Native Forest Organic brand)
1 tsp pure maple syrup
1/2 tsp vanilla extract

plus one square of dark chocolate, shaved, for garnish

Turn the can of coconut milk upside down and remove the lid. Drain the liquid out of the can, then scoop out the remaining solid coconut cream into a mixing bowl. Beat the cream with an electric mixer to soften it up a little. Add the maple syrup and vanilla extract and beat the cream again until it is smooth and fluffy. Spoon the whipped coconut cream into a piping bag fixed with a wide star tip.

To assemble the cupcakes:

Carefully spread a spoonful of the cherry sauce over the top of each cupcake, following the outline of the heart. Pipe a heart-shaped serving of whipped coconut cream in the centre of each cupcake, then sprinkle the shaved dark chocolate on top. If not serving immediately, store the cupcakes in the refrigerator.


Happy Valentine's Day! I hope your weekend finds you enjoying good times with loved ones.

Sunday, January 17, 2016

Almond Cherry Orange Biscotti (gluten-free, vegan)

On Christmas Eve afternoon, I called my grandma in Sault Ste. Marie to tell her I was thinking about her and to wish her a Merry Christmas. I was feeling as I often do when special occasions approach, and I am here and so many of my extended family members are there: flooded with warm memories of the happy family gatherings of my childhood, and wishing a little wistfully that it was somehow easy to recreate them in the same way now.

My grandma and I chatted cheerfully about the preparations we'd each been making for the holidays. She told me about the dozens of genettis and pintas she had baked and given away, the cheese and meat ravioli she'd prepared for family dinners, and the most recent batch of biscotti to come out of her oven that week, which were orange flavoured and dotted with chopped almonds and dried cherries. (Have I mentioned before that my grandma is eighty-six years old? Eighty-six, and still finding joy in baking and cooking up wonderful foods to share with the people she loves. "What else am I going to do?", she asks me. "You've gotta keep busy." I hope I have half of the strength and enthusiasm she does when I'm her age.)

I told her I liked the sounds of her biscotti, and she asked me if I thought I could make them in such a way that I'd be able to eat them. I told her I was pretty sure I could. And then one day in early January, an envelope addressed to me in my grandma's handwriting showed up unexpectedly in my mailbox.


My grandma had thoughtfully written out her biscotti recipe for me, and included a series of photos from a magazine to illustrate the method for making them. I was especially eager then to try making a batch of my own. Having my grandma's encouraging handwritten instructions made me feel almost as though she were here with me in my kitchen.

I had to modify my grandma's recipe quite a bit to eliminate gluten, eggs, and refined sugar, but the almond flour version I came up with has the same delicious flavours hers did. The sweet orange flavour and tart cherries scattered through a crispy cookie were a big hit with my eager dessert eaters here at home.

Almond Cherry Orange Biscotti


2 1/2 cups blanched almond flour
2 tbsp coconut flour
1/4 cup coconut palm sugar
1 tsp baking powder
1/4 tsp sea salt
1/3 cup chopped walnuts
1/4 cup dried cherries (I like Eden brand, with no added refined sugar)
the zest of one orange
1/4 cup melted coconut oil
1/4 cup fresh orange juice

Preheat the oven to 325 F. Combine the almond flour, coconut flour, coconut sugar, baking powder, sea salt, walnuts, dried cherries, and orange zest in a large mixing bowl.

Add the melted coconut oil and the orange juice to the almond flour mixture. Stir well, until a crumbly dough forms. Knead the dough with your hands until it all sticks together.

On a parchment paper lined baking sheet, form the dough into a long, flat oval with your hands. (See the example my grandma sent me in the first photograph above. I think my oval was a little too wide this first try; next time I'll try making it longer and a little taller to improve the shape of the finished biscotti.) Bake in the preheated oven for 30 minutes, then allow the baked dough to cool completely.

With a sharp knife, slice across the width of the cooled oval to create biscotti that are each about an inch wide. Place the biscotti cut side up on the baking sheet once more, and bake them for another 10 to 15 minutes at 325 F, keeping an eye on them so they don't brown too much. Allow the biscotti to cool again until they are crispy.

I was really pleased to be able to create a version of my grandma's biscotti that all of us can enjoy. They're a delicious accompaniment to a hot cup of coffee or tea and a good book on a winter afternoon. I've saved my grandma's letter along with my own recipe notes in my cookbook now -- I'll think very fondly of her every time I make this special treat.


Tuesday, December 29, 2015

"Fancy Drinks": A Kids' New Year's Eve Cocktail

We've been enjoying a wonderful Christmas holiday here. There have been fun visits and special dinners with cousins and aunts and uncles, late mornings in pyjamas, movie nights with four of us tucked up under warm blankets in our now finished and very cozy basement, afternoons spent enjoying new books and Lego sets and games, Christmas cookies and steaming mugs of tea in the evenings. The holiday season is a gift in and of itself, I think, the way it gives us so many hours to spend in each other's company, playing and laughing and eating and resting to our hearts' content.

As 2015 nears its end, perhaps you and your family are making plans for a New Year's Eve celebration. We're making plans here, too, ones that involve more family and food and fun, so we can welcome 2016 with the same positive energy we hope to keep with us all year long. Whenever there is a celebration being talked about around here, Will requests "fancy drinks" for the kids, so they can enjoy something bubbly as well as the grown-ups. I'm not a fan of pop, even on special occasions, but I'm happy to create something fizzy and sweet from natural ingredients to fill the kids' toasting glasses. This "fancy drink", made from orange and pomegranate juices and sparkling water, is one of my boys' favourites.


You can make these fun kids' cocktails very simply by adding a few ice cubes to each glass, filling them one third of the way up with orange juice, adding a generous splash of pure pomegranate juice, then topping them up with sparkling water. A few fresh cranberries or orange slices make the drinks look extra special, and Will likes when I add a striped straw and a little paper drink umbrella to each glass, too.

Cheers to you, wherever you are -- I hope you've been enjoying a wonderful holiday, too!

Wednesday, December 9, 2015

Maple Spiced Nuts

Christmas preparations are now in full swing at our house. I've been having fun this week working on one of everyone's favourite parts of the holiday season: the delicious foods and special treats we'll enjoy with family and friends who come to visit. The boys have each put in their requests for which cookies and squares they hope will make the baking list this year, and I'm looking forward to recreating some of our family's best-loved traditional foods that evoke happy memories of Christmases past.

One of the treats that was always around in little bowls at Christmastime during my childhood was roasted mixed nuts. Everyone had their favourites (brazil nuts for my dad, cashews for my mom and me), and the salty snack was always great to munch on while we enjoyed drinks and laughs with relatives. This week I noticed a recipe for sweet and spicy nuts in the December issue of Chatelaine magazine, and it reminded me that I've long wanted to try making a roasted nut mixture of my own for the holiday season. Today I tweaked the ingredients of the magazine recipe to suit my own preferences and ended up with a pan full of fragrant and tempting snacks.

Maple Spiced Nuts


2 1/2 cups of shelled natural nuts (I used 1/2 cup each of almonds, walnuts, pecans, cashews and hazelnuts)
1/2 cup unsweetened large flake coconut
1 tbsp coconut oil
1/4 cup pure maple syrup
1/2 tsp vanilla extract
1 tbsp ground cinnamon (I like to use Frontier organic cinnamon, which is especially flavourful)
1/8 tsp ground ginger
1/8 tsp ground allspice
1/4 tsp sea salt

Preheat the oven to 275 F. In a large mixing bowl, combine the nuts and the large flake coconut.

Place the coconut oil in an oven-safe bowl and set it in the oven to melt while the oven is preheating. Once the oil is liquefied, remove it from the oven and add the maple syrup, vanilla, cinnamon, ginger, and allspice to the bowl. Whisk well to combine.

Pour the syrup and spice mixture over the nuts and stir to coat. Sprinkle the sea salt over the nuts and stir again. Spread the nuts out on a parchment paper lined baking sheet. Bake in the preheated oven for 40 minutes, stirring once every 10 to 15 minutes.

Allow the nuts to cool before serving.

These roasted nuts are a perfect combination of maple sweetness and cinnamony spice, and I'll be happy to set them out in little bowls this holiday season so everyone can enjoy their favourites. (It's still cashews for me!) Maple spiced nuts would also make lovely homemade holiday gifts if placed in pretty glass jars tied with festive ribbon. Enjoy!


Monday, November 9, 2015

Cashew Butter Brownies (gluten-free, dairy-free, egg-free)

One evening later this week I'll be attending a book club meeting with a group of friends. (We're reading Elizabeth Hay's His Whole Life, a book so beautifully written that I'm reading it a second time this week just to savour the images and feelings it evokes.) Our once-a-month meetings are as much about friendship and food as they are about discussing literature; everyone brings along an appetizer or sweet treat to share and we always spend an enjoyable few hours catching up with each other.

While thinking about what food to bring for this month's meeting, I remembered an old favourite brownie recipe I used to make years ago from the Better Homes and Gardens' New Baking Book. Those rich brownies, topped with chocolate chips, toffee bits, and nuts, were a definite crowd-pleaser, and I was curious to see if I could create a new version of them that was free of gluten, dairy and eggs. My curiosity paid off: the dark chocolate cashew butter brownies that came out of my oven today were every bit as scrumptious as the ones I remembered loving long ago. I'm happy to be able to share this classic treat with Will now, too!

Cashew Butter Brownies


one 500g jar of natural cashew butter
2 tbsp ground chia seeds mixed with 6 tbsp water (stir and let stand for a minute to form a gel)
1/2 cup pure maple syrup
2 tsp vanilla extract
1 cup blanched almond flour
1/2 cup cocoa powder
1/4 tsp sea salt

1/3 cup chopped walnuts
1/3 cup unsweetened large flake coconut
1/4 cup chopped dark chocolate

Preheat the oven to 325 F.  Line a 9 by 13 inch baking pan with two pieces of parchment paper, one placed over the other in opposite directions.

Add the cashew butter, chia seed mixture, maple syrup, and vanilla to a large mixing bowl and beat these ingredients with an electric mixer until they are well combined.

In a smaller bowl, combine the almond flour, cocoa powder, and sea salt. Gradually add the dry ingredients to the cashew butter mixture, beating with the electric mixer after each addition, until you have a uniform batter.

Spread the batter into the prepared baking pan, using the back of a spoon to smooth it out evenly. Sprinkle the chopped walnuts, coconut flakes, and dark chocolate bits on top of the batter. Bake in the preheated oven for 30 minutes.

Let the brownies cool completely. Lift the edges of the parchment paper to remove the cooled brownies from the pan, place them on a large cutting board, and cut them into squares using a sharp knife. Serve and make everyone happy. (These brownies go perfectly with a cold glass of homemade almond milk!)

I'm looking forward to sharing these decadent brownies with my friends later this week. I think I'm going to have to bake a second batch before the book club meeting, though -- these ones sure won't last long at our house!

Sunday, October 4, 2015

Pumpkin Spice Cake with Maple Icing (gluten-free, dairy-free, egg-free)

It was a very autumn-y sort of weekend around our house.  Matt and the boys and I went and visited a local orchard this afternoon, where we walked among the rows of fruit-laden trees and had fun filling four large bags with shiny red apples together.

These two kooky kids are always the apples of my eye.

The rest of the weekend was pretty blustery and damp outside, so it was a great opportunity to spend time in the kitchen cooking up foods for fall feasting: some homemade granola, a batch of oatmeal cookies for school lunches, beef pot roast for dinner, and a pumpkin spice cake with maple icing for dessert. This cake has quickly become a new seasonal favourite in our house; it's a just-right combination of savoury and sweet that goes perfectly with a warm mug of apple cinnamon tea.

Pumpkin Spice Cake with Maple Icing


For the cake:

6 cups blanched almond flour
6 tbsp arrowroot flour
2 tsp baking powder
1/2 tsp sea salt
2 tsp ground cinnamon
1/2 tsp ground ginger
1/2 tsp ground allspice
2 cups pure pumpkin puree
1/2 cup grapeseed oil
1/3 cup pure maple syrup
6 tbsp unsweetened almond milk
2 tsp vanilla extract

Preheat the oven to 350 F. In a mixing bowl, combine the almond flour, arrowroot flour, baking powder, sea salt, cinnamon, ginger, and allspice.

In a separate large mixing bowl, whisk together the pumpkin puree, grapeseed oil, maple syrup, almond milk, and vanilla. Add half of the dry ingredient mixture to the wet ingredients, stirring to combine, then add the rest of the dry ingredient mixture and stir again until you have a nice thick cake batter.

Lightly grease a bundt pan with grapeseed oil, then spoon the cake batter into the pan. Smooth the batter with the back of a spoon to create a level top. Bake the cake in the preheated oven for 55 minutes to an hour, or until a cake tester inserted in the cake comes out clean.

Remove the cake from the oven and let it cool in the pan for about 15 minutes. Carefully invert the bundt pan onto a wire rack to remove the cake from the pan and let it cool completely.

For the icing:

1/4 cup raw coconut butter
1 tbsp + 1 tsp coconut oil
1 tbsp + 1 tsp pure maple syrup

toasted chopped pecans for garnishing

Beat the coconut butter, coconut oil, and maple syrup in a bowl with an electric mixer on high speed until a smooth mixture forms. Spoon this mixture into a piping bag fitted with a small round tip. Pipe the icing in loops over the top of the cake, and garnish with toasted chopped pecans.

When Will came in from outside yesterday afternoon and smelled this pumpkin spice cake baking, he exclaimed, "Oh my gosh, I could just float away! It smells like heaven in here!" We all agreed after dinner that it tasted every bit as delicious as it smelled. Maybe you'd like to bake up one of these tasty cakes yourself for a fun fall celebration this month.


Sunday, September 20, 2015

Pork Souvlaki with Lemon Roasted Potatoes and Greek Salad (gluten-free, dairy-free)

We did one of our usual (and most enjoyable) Saturday errands yesterday -- a visit to our favourite local food shop to choose items for some delicious weekend family meals. While the four of us were discussing possible selections at the butcher counter, Will noticed some pre-seasoned pork done up on skewers and ready to grill, and he asked if we could get them for dinner. We liked the idea of trying something different, but we decided to buy whole unseasoned pork tenderloin instead, so we could put together a Greek inspired dinner all on our own: souvlaki, lemon roasted potatoes, and a Greek salad with homemade dressing. Our meal was quite simple to prepare, but you'd never know it from the enticing aroma that filled our house and yard as the potatoes were roasting and the pork was grilling. We all loved this very flavourful dinner and will definitely enjoy it again some weekend soon!

Pork Souvlaki with Lemon Roasted Potatoes and Greek Salad


For the pork souvlaki:


2 pork tenderloins, cut into one and a half inch cubes
1/3 cup olive oil
the juice of one and a half lemons, freshly squeezed
1 tbsp red wine vinegar
1 large clove of garlic, minced
a few sprigs of each of fresh oregano and thyme leaves, finely chopped (lemon thyme is nice, too!)
sea salt, to taste

In a large shallow glass dish, combine the olive oil, lemon juice, red wine vinegar, garlic, oregano, thyme, and sea salt. Add the pork tenderloin pieces and stir so that the pork is well coated with the marinade. Cover and marinate the pork in the refrigerator for at least three hours.

Preheat the barbecue. Thread the pork tenderloin pieces onto skewers. (If you're using wooden skewers, be sure to soak them in water for about 15 minutes first so that they don't burn on the grill.) Grill the pork skewers over medium-high heat, turning frequently, for 15 to 20 minutes or until the pork is cooked through.

For the lemon roasted potatoes:

5 small red potatoes and 5 small white potatoes, scrubbed and cut into quarters
1 1/2 tbsp olive oil
1 clove of garlic, minced
the juice and zest of half a lemon
a sprig of fresh oregano leaves, finely chopped
sea salt and pepper, to taste

Preheat the oven to 400 F.  Toss the potato pieces with the olive oil, garlic, lemon juice and zest, oregano, sea salt and pepper in a roasting pan.  Roast the potatoes for about 45 minutes in the preheated oven, stirring occasionally.

For the salad:

Add mixed greens, chopped red and yellow sweet peppers, chopped cucumber, halved cherry tomatoes, sliced red onion, and kalamata olives to a salad bowl.

In a jar with a tight fitting lid, combine:
3 tbsp olive oil
1 1/2 tbsp freshly squeezed lemon juice
1 1/2 tbsp red wine vinegar
1 small clove of garlic, minced
1 small sprig of fresh oregano leaves, finely chopped
sea salt and pepper, to taste

Shake the dressing well, then pour over the salad and toss just before serving. (Extra dressing can be stored in the refrigerator.)

Try this tasty souvlaki dinner -- it will have you wanting to shout "Opa!" (You might want to draw the line at smashing the plates, though.  ;) )


Monday, August 3, 2015

Easy Bumbleberry Jam

It's a holiday in our province today, and a quiet summer Monday morning seemed like just the right time to make some jam with the baskets full of fresh local berries we had in our fridge. I've been curious to try making a jam thickened with chia seeds, versions of which I've been seeing all over the internet, for awhile now, and the bumbleberry kind that came out of my experimenting made me happy that I finally got around to it. This really tasty jam requires very few ingredients, is lightly sweetened, and is super simple to make: a perfect summer treat!

Easy Bumbleberry Jam


4 cups mixed fresh berries, washed 
 (I used a cup each of strawberries, red raspberries, black raspberries, and blueberries)
1 tbsp coconut sugar
2 tbsp ground chia seeds 

Place the berries in the bowl of a food processor, and pulse for a few seconds at a time until all of the berries break down. (If you don't have children like mine who are adamantly opposed to any recognizable pieces of fruit in their jam whatsoever, you can skip this step.)

Place the berries in a saucepan over medium heat, and sprinkle in the coconut sugar. Cook this mixture for about 10 minutes, stirring often.

Stir in the ground chia seeds, a little at a time. Reduce the heat to medium low and cook the mixture for another 10 minutes or until it is thickened, stirring often.

Remove the jam from the heat and allow it to cool slightly.  Spoon the jam into glass jars with tight fitting lids and place them in the refrigerator to cool completely.

This jam is bursting with berry flavour and is delicious spread on toast or rice cakes with natural nut butter, spooned onto homemade biscuits, or stirred into plain, unsweetened yogourt or oatmeal. Will loved the sample I gave him and declared that he was going to eat this jam every single day from now on. Given its low added sugar content, I'm very happy to agree to that!


Are you looking for other delicious things to make with fresh berries? You might also enjoy this berry galette (which I made this weekend, too!) It's so nice to enjoy these wonderful summer foods while we can.


Tuesday, July 7, 2015

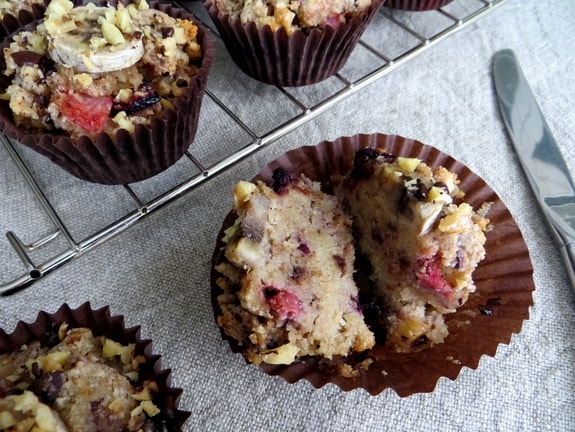
Banana Split Muffins (gluten-free, vegan)

About a year and a half ago, I was invited to participate in a March Muffin Madness event hosted by my blogger friend Shirley of gfe. When I asked the boys to help me brainstorm ideas for a new muffin recipe to share with her readers, they offered their usual suggestion of "Make something with chocolate!". I decided to indulge them by creating a banana split muffin recipe that was both decadent and healthy. The muffins were a huge hit at our house, and I received many enthusiastic comments about them from readers who were eager to try them out. Shirley recently suggested to me that I give my banana split muffin recipe a home on my own site now as well, so today I'm sharing it in full here. If you missed trying these muffins the first time around, now is the perfect opportunity, since fresh, sweet strawberries and cherries are both in season!

Banana Split Muffins


  • 2½ cups blanched almond flour
  • ½ cup certified pure gluten-free oats, ground
  • ¼ tsp sea salt
  • ¼ tsp baking soda
  • ¼ cup melted coconut oil
  • 2 tbsp pure maple syrup
  • 1 tsp vanilla
  • 1 tbsp ground chia seeds mixed with 3 tbsp water (stir and let stand for a minute to form a gel)
  • 2 mashed ripe bananas
  • ½ cup chopped fresh strawberries
  • ½ cup chopped sweet dark cherries
  • ¼ cup chopped walnuts
  • ¼ cup chopped dark chocolate (at least 70% cocoa)
  • 12 fresh banana slices, plus some extra chopped walnuts and dark chocolate for sprinkling on top of the muffins
  1. Preheat the oven to 350 F, and fill a 12-cup muffin tin with paper baking liners. In a large mixing bowl, combine the almond flour, ground oats, sea salt, and baking soda.
  2. Whisk together the melted coconut oil, maple syrup, and vanilla in a smaller bowl, and then add the wet ingredients to the dry ingredients. Stir well to combine. (The mixture will be somewhat dry and crumbly.)
  3. Add the mashed bananas and the chia seed gel to the mixture and stir until a thick, uniform batter forms. Fold in the strawberries, cherries, walnuts, and dark chocolate.
  4. Divide the batter evenly between the 12 lined muffin cups. Place a banana slice on the top of each muffin and sprinkle some additional chopped walnuts and dark chocolate on top. Bake in the preheated oven for 30 minutes. Cool and serve.


Baking muffins is a great way to pass time with the kids on a rainy summer day. (That's exactly what we've been up to this afternoon at our house!) These banana split muffins make a delicious breakfast treat to share with family and friends on happy summer mornings.

Monday, June 29, 2015

Naturally Sweet Strawberry Lemonade

Summer vacation got off to a bit of a false start this past weekend.  Matt and the boys and I were very much looking forward to a couple of days of having nothing specific to do after school finished for the year on Friday; we planned to spend most of our time enjoying the sunshine and water in our backyard. We ended up enjoying water all right, in the form of copious amounts of rain that fell all weekend long. The sun was nowhere in sight, and the rain brought with it some crazy winds that picked up our patio table and threw it upside down, smashing the glass top into a gazillion little pieces all over our deck.


We still made the most of an otherwise quiet family weekend, though -- we played board games, and worked on solving puzzle cubes (Noah and Will are both hooked on the Pyraminx these days), and baked, and went shopping for a replacement patio table (one without a glass top!)  And today, the warm sun came back out and our summer got off to a wonderful, real start.

Hot summer days call for tall, cool glasses of refreshing drinks, and one of my favourites has always been pink lemonade.  What I don't love about most of the store-bought varieties of this tasty summer thirst-quencher, though, is the excessive amount of sugar they contain.  I've discovered that it's very easy to make my own lemonade at home, using real fruit rather than sugar as the starring ingredient. Fresh strawberries (especially the deliciously sweet Ontario ones that are in season now) add a pretty pink hue as well as a wonderful flavour to this lemonade, and real lemon juice, sweetened with only a tablespoon of honey, makes sure it still has a nice bit of pucker power!

Strawberry Lemonade


3/4 cup fresh ripe strawberries
juice of two lemons (approximately 1/2 cup of freshly squeezed juice)
6 cups of cold water
1 tbsp honey
ice, lemon slices

Wash and hull the strawberries, and place them in the jar of a blender with one cup of the cold water. Blend on high speed until the strawberries are completely pureed. Strain the strawberry mixture through a fine mesh sieve (to remove any seeds), into a tall pitcher.

Add the freshly squeezed lemon juice, the remaining five cups of cold water, and the honey to the pitcher, and stir the lemonade with a long spoon.  Finish off the lemonade with a handful of ice cubes and some lemon slices before serving.

If your family is used to a sweeter lemonade, try playing around with more strawberries, and a little less lemon juice at first.  (My guys love lemons, so they are very happy with a more tart version.) I hope you'll find this lemonade a great option for staying cool and hydrated this summer.  :)

Tuesday, May 12, 2015

Strawberry Rhubarb Scones (gluten-free, vegan)

Last year my mom-in-law kindly sent me part of one of her rhubarb plants so I could start growing the pretty pink and green vegetable in my own yard. I've always loved rhubarb; its mouth-puckering tartness signifies the coming of summer and is so delicious baked into pies and muffins and crisps. Last week while I was doing some spring gardening, I was happy to see that the little rhubarb plant was happy and thriving in its new home, and there were some stalks almost ready to be picked and enjoyed. This fact definitely called for some baking in the near future!

I wanted to try something different than my usual rhubarb recipes, so today I decided to create some scones with rhubarb and strawberries baked into them. The scones I made are loosely based on this recipe from Elana's Pantry, which is one of my family's favourites for special occasion breakfasts.

I even had a little helper while I baked this morning. (Well, sort of. Iris's idea of helping is leaping from the back of a kitchen chair onto the counter, knocking things over, then sprawling out in the middle of everything so she can get a close up view of what's happening... and hopefully something to eat in the process!)

Who, me?

Iris didn't get to eat any scones, but the human members of my family all enjoyed them very much!

Strawberry Rhubarb Scones


3 cups blanched almond flour
2 tbsp arrowroot flour
1/2 tsp ground cinnamon
1/4 tsp baking soda
1/4 cup unsweetened almond milk
1/4 cup pure maple syrup
1 tsp vanilla extract
1/2 cup thinly sliced strawberries
1/3 cup thinly sliced rhubarb
natural sliced almonds, for sprinkling on top

Preheat the oven to 350 F. In a large mixing bowl, combine the almond flour, arrowroot flour, cinnamon, and baking soda. Whisk together the almond milk, maple syrup, and vanilla in a smaller bowl, then add the wet ingredients to the dry ingredients and mix well, until a slightly crumbly dough forms. Fold in the strawberries and rhubarb.

Knead the dough briefly with your hands to make it all stick together in one ball, then place it on a parchment paper lined baking sheet. Press the dough into a flat disk that is about an inch and a half high. Using a sharp knife, cut the disk into eight triangles. Separate the triangles from each other on the pan, and sprinkle the top of each one with sliced almonds. Bake for 15 to 20 minutes, or until the scones are golden brown. Let them cool slightly, then serve.

Delicious scones like these ones, filled with sweet/tart fruit and toasted almonds, make a wonderful breakfast treat or a perfect accompaniment to an afternoon cup of tea.

What is your favourite way to use rhubarb this time of year?


This post is linked to Gluten-Free Wednesdays.

Monday, May 4, 2015

Baked Salmon Cakes (gluten-free, egg-free)

In the summer months, Matt and I love eating fresh wild salmon that he grills on the barbecue and brushes with a maple glaze -- it's one of our favourite warm weather dinners. It will still be a couple of months before the fresh salmon is available at our local fish counter, so right now I'm still thinking of appealing ways to use canned wild salmon, which is also a good source of omega-3 fatty acids, in some of our meals.

Today I tried making fish cakes by combining salmon with mashed potatoes, green onions, fresh herbs, and lemon and baking them in the oven. Served over pea shoot greens, these salmon cakes made a tasty and satisfying lunch that was simple to put together, too!

Baked Salmon Cakes


2 medium sized yukon gold potatoes (enough to make 2 cups of mashed potatoes)
2 105g cans of boneless, skinless wild salmon, drained
2 tbsp thinly sliced green onion
1 tbsp chopped fresh parsely
1 tsp Dijon mustard
the zest of one small lemon
sea salt and pepper, to taste

Peel the potatoes, cut them into chunks, and boil them in a pot of water over high heat on the stove for approximately 20 minutes, or until they are tender. Drain the water from the potatoes and mash them thoroughly. Spread the mashed potatoes out over the bottom of a mixing bowl and set them in the fridge to cool for 15 minutes.

Preheat the oven to 400 F. Once the potatoes have cooled, flake the salmon into the bowl and add the green onion, parsley, Dijon mustard, lemon zest, sea salt and pepper. Stir to combine all ingredients.

Divide the salmon and potato mixture into six equal parts, and form each part into a patty with your hands. Place the patties on a baking sheet. Bake the salmon cakes for 8 minutes, then gently flip them with a spatula and bake them for another 8 minutes.

Serve the salmon cakes warm, on a bed of pea shoots or other greens drizzled with a simple dressing made from olive oil, fresh lemon juice, sea salt and pepper. Enjoy!

Monday, April 6, 2015

Banana Orange Cake with Whipped Coconut Cream and Fresh Berries (gluten-free, dairy-free, egg-free)

Easter weekend was filled with a little bit of everything, both weather-wise and in terms of what our family got up to. It was sunny on Friday and Saturday, then Sunday morning we woke up to a fresh layer of snow on the lawn, which made it seem more like Christmas than Easter. We headed outside to enjoy the sunshine when we could, and spent time redecorating Will's bedroom (more on that later) and preparing an Easter feast and some special holiday treats in the kitchen whenever the weather was gray and cool. The four day weekend was a really nice break from the regular routine, and a great opportunity for some enjoyable family time together.


For Easter treats, Noah and Will requested their favourite homemade dark chocolate goodies: coconut creme eggs and cashew butter eggs. I was happy to indulge the boys, mostly just because I love them, but also because I love those eggs as much as they do! In addition to the usual sweets, though, I wanted to prepare a non-chocolate dessert for our Easter dinner that felt spring-like, even if the weather didn't want to cooperate.  This banana orange cake with whipped coconut cream and fresh berries was very much enjoyed by the whole family last night.  The cake is wonderfully moist and flavourful, and was a perfect end to our delicious glazed ham and roasted vegetable Easter meal.

Banana Orange Cake with Whipped Coconut Cream and Fresh Berries


6 cups blanched almond flour
6 tbsp arrowroot flour
1/2 tsp sea salt
1/2 tsp baking soda
1/2 cup grapeseed oil
1/3 cup pure maple syrup
6 tbsp orange juice
1 tbsp vanilla extract
2 cups mashed ripe bananas

2 398mL cans of full-fat coconut milk (refrigerate overnight before using)
1 tbsp pure maple syrup
1 tsp vanilla extract

1/2 cup fresh blueberries
1/2 cup fresh raspberries
1 cup fresh strawberries, sliced

Preheat the oven to 350 F, and lightly grease two 8-inch round cake pans with grapeseed oil.

In a large mixing bowl, combine the almond flour, arrowroot flour, sea salt and baking soda. Whisk together the grapeseed oil, maple syrup, orange juice, and vanilla extract in a separate bowl. Add the wet ingredients to the dry ingredients and mix well with a large spoon. Stir the mashed bananas into the batter, making sure everything is well-combined.

Divide the cake batter evenly between the two prepared baking pans, smoothing out the top of each cake with a spatula, and bake in the preheated oven for approximately 35 minutes, or until a toothpick inserted in the centre of a cake comes out clean. Allow the cakes to cool in the pans on a wire rack for about 15 minutes. Carefully loosen the edges of the cakes with a knife, and invert the pans onto wire racks to release the cakes from them. Allow the cakes to cool completely.

Prepare the whipped coconut cream by opening the two cans of coconut milk and scooping out the solid cream from the top of the cans into a mixing bowl. Add a tablespoon of pure maple syrup and a teaspoon of vanilla to the cream, then beat on high speed with an electric mixer until smooth and fluffy.

Place one of the cooled cakes on a plate. Spread half of the whipped coconut cream over the top of the cake, then gently place the second cake on top of the cream. Spread the remaining whipped coconut cream over the top of the second cake, and arrange the fresh berries on top of the second layer of cream. Serve and enjoy! (Any remaining cake should be stored in the refrigerator to keep the cream and berries fresh.)

Today the sun is shining again, and while Matt had to return to work this morning, the boys and I are taking full advantage of one more leisure-filled afternoon. We're all looking forward to Easter leftovers (especially this cake :) ) for dinner again tonight! I hope your Easter weekend was lovely, too, and that spring weather is showing its warm, smiling face where you are.


This post is linked to Gluten-Free Wednesdays.

Wednesday, March 4, 2015

Comfort Food: Chili and Tea Biscuits (gluten-free, dairy-free)

March appears to be coming in more like a lion than a lamb this year, so in our house we're still warding off winter chills with warm comfort foods for dinner.  I've always loved the ease of preparing a big pot of chili in the afternoon to enjoy with my family in the evening.  The chili fills the house with its delicious aroma as it simmers away on the stove, and a steaming bowl of this hearty, healthy concoction of foods makes a very satisfying meal.

When I was growing up, my mom would often bake homemade tea biscuits when she was making chili for dinner.  Those biscuits, served warm right out of the oven, were oh so good that I can still remember how much I loved them, even though I haven't had them for years.  Today I decided to try baking an almond flour version of the biscuits to go along with some homemade chili I was having for lunch. I'm so glad I thought of biscuits today -- these tasty almond flour ones really hit the spot!

Chili


1 lb lean ground beef  (or turkey)
1 tbsp olive oil
1 small onion, diced
half of a large red pepper, diced
half of a large yellow pepper, diced
1 stalk celery, diced
6 cremini mushrooms, sliced
1 large carrot, finely grated
1 large clove of garlic, minced
1 540mL can of red kidney beans, drained and rinsed
1 540mL can of chickpeas, drained and rinsed
1 796mL can of diced tomatoes
half of a 796mL can of crushed tomatoes
sea salt, pepper, chili powder, and dried parsley, to taste

Heat the olive oil in a large pot over medium high heat.  Add the ground beef, breaking it up with a spoon, and cook until the beef is browned.  

Add the onion, red and yellow pepper, celery, mushrooms, carrot, and garlic to the pot.  Cook until the vegetables have softened, stirring often.

Stir in the kidney beans and chickpeas, then add the diced and crushed tomatoes.  Bring the mixture to a low boil, stirring occasionally to ensure all ingredients are well combined.  Season the chili with sea salt, pepper, chili powder, and dried parsley, to your liking. 

Reduce the heat to low, and simmer the chili for several hours, stirring occasionally.  Serve hot.

Tea Biscuits


3 cups blanched almond flour
2 tbsp arrowroot flour
1 tsp baking powder
1/4 tsp sea salt
5 tbsp warm water
1 tbsp raw honey

Preheat the oven to 350 F.  In a large mixing bowl, combine the almond flour, arrowroot flour, baking powder, and sea salt.

Whisk together the water and honey in a separate small bowl, then add the wet ingredients to the dry ingredients.  Stir well until a nice dough consistency is reached.

Sprinkle a little almond flour on your work surface, and turn the dough out onto it.  Use your hands to lightly flatten the dough to about a one-and-a-half inch thickness.  Using a circular biscuit cutter, press out rounds of dough and place them on a parchment paper lined baking sheet.

Bake the biscuits in the preheated oven for approximately 20 minutes, or until they are a lovely golden brown colour on the top and bottom.  Serve warm. 

These tea biscuits are delicious eaten just the way they are alongside a bowl of chili, or you can spread them with a little coconut oil if you prefer.  (I think they would also make a really nice snack on their own if you added a dollop of fruit spread on top.)

I can't deny that we're all wishing for milder weather here soon, but we'll make the most of the cold days that linger on by enjoying a few last rounds of winter's most comforting dishes. 


I hope you're all finding happy ways to keep cozy and warm, too!


Tuesday, February 17, 2015

Homemade Chocolate Hazelnut Spread + A Nutritious Breakfast Idea (dairy-free, gluten-free)

Last Friday, CBC's Marketplace aired an interesting episode dedicated to food labelling, and the ways in which food companies try to persuade shoppers that their products are healthy choices by making deceiving nutritional claims.  This practice probably doesn't come as a surprise to many of us; we've heard plenty of stories in the media in recent years that have revealed the plain truth about what exactly is inside the packages of food that line our grocery store shelves.  One product that has received quite a lot of attention of late is a certain chocolate hazelnut spread.  While it definitely tastes delicious, the spread is far from a nutritious breakfast food as the manufacturer would like us to believe. (If you're interested in seeing exactly what is inside a tablespoon of nutella, Dr. Yoni Freedhoff gives an eye-opening demonstration in this Marketplace clip.)

Knowledge is power, and when we take the time to really read and understand the labels on packaged foods, we gain the wisdom to make healthier choices for ourselves and our families.  If you're a fan of chocolate hazelnut spread, you can choose a nutritious homemade version like the one I made this weekend that stars hazelnuts rather than sugar as its main ingredient.  There's no need to hide this easy-to-make and richly flavourful spread behind misleading claims; it really can be part of a nutritious breakfast.

Homemade Chocolate Hazelnut Spread


1 1/2 cups natural hazelnuts
3/4 cup full fat coconut milk
1/4 cup cocoa powder
2 tbsp raw honey
1 tsp vanilla
a pinch of sea salt

Preheat the oven to 300 F.  Spread the hazelnuts out on a rimmed baking sheet and lightly toast them in the oven for about 8 minutes.  Place the toasted hazelnuts in a tea towel and rub them with the towel to remove as much of their skins as possible.  

Place the hazelnuts in the bowl of a food processor and process on high, stopping to scrape down the sides of the bowl as needed, until the hazelnuts are finely ground.  (This could take several minutes to get them ground finely enough.)

In a saucepan over medium low heat, warm the coconut milk and add the cocoa powder, stirring until a smooth mixture forms.  Remove the mixture from the heat and stir in the honey and vanilla.

Add the coconut milk and cocoa mixture to the ground hazelnuts in the food processor bowl and sprinkle with a pinch of sea salt.  Process on high speed for another several minutes, stopping to scrape down the sides of the bowl as needed, until a smooth spread forms.

Spoon the chocolate hazelnut spread into a glass jar with a tight fitting lid and store it in the refrigerator.

We like to stir a spoonful of this nutty, chocolatey spread into a bowl of oatmeal topped with bananas, hazelnuts, and cinnamon in the morning -- it's a happy way to start the day.  

Chocolate Hazelnut and Banana Oatmeal


1 serving of hot oatmeal, prepared according to package directions 
  (*use certified pure oats, or quinoa flakes, or a hot brown rice cereal for gluten-free options)
1 small banana, half of it coarsely chopped and half of it sliced into rounds
1 tbsp homemade chocolate hazelnut spread
chopped hazelnuts and cinnamon, for sprinkling on top
a splash of unsweetened almond milk

Spoon the hot prepared oatmeal into a bowl and stir in the chopped bananas.  Swirl in the chocolate hazelnut spread with a spoon, then top the oatmeal with the sliced bananas, chopped hazelnuts, and a bit of cinnamon.  Add a splash of almond milk and serve.  Delicious!

It's a good feeling to be able to make healthier, homemade alternatives to packaged foods that aren't all they claim to be.  I'd love to hear about your kitchen successes in recreating store-bought favourites at home -- please share your ideas!


This recipe is linked to Gluten-Free Wednesdays.